introduction
Arduino is an open-source electronics prototyping platform founded on flexibility: The information is freely available, which means that someone can appreciate the Arduino project without consulting the company that designed the Arduino board.
For this reason, the Arduino is widely known in the world. Easy-to-use hardware and software.
In this article, I will focus on Arduino’s basic and attachment projects, followed by some concepts that should be known.
Arduino software IDE (PC software)
The Arduino IDE is the official software to write and upload code to the Arduino boards. The IDE is written in C/C++ and based on Processing.
The Arduino IDE is a cross-platform application on Linux, Mac OS X, and Microsoft Windows operating systems. It can be downloaded for totally free from the Arduino website. The program is downloaded to the Arduino board from the computer.
Programs are downloaded to the Arduino board with a specific logic to make the program run. You can download the Arduino program on its page. Follow the steps in this article.
Arduino hardware ( Arduino board)
Arduino is open-source hardware. It was founded in 2005 by Massimo Banzi, David Cuartielles, David Mellis, Tom Igoe, Gianluca Martino and David A. Mellis.
The company’s products are designed to make it easier for people without a background in electronics to use hardware like microprocessors and programmable circuits.
Arduino Framework ( Arduino board)
Arduino Framework is the software present on the Arduino, specifically the chip that is the brain of the Arduino, which we call a microcontroller.All of these components are entirely related to the Arduino.
Arduino Uno
The Arduino Uno is the most popular board among beginners and is designed to be as easy as possible to use. It’s ideal for students, hobbyists, and anyone who wants to learn about electronics, programming, and physical computing.
You can view all types of Arduino through the following link from Arduino official website .
What can we do with the Arduino board?
Arduino is a microcontroller that can be used for many different purposes. It can be used as a controller for a robot, as an interface to the Internet, or even to make your video games, weather station, distance measurement and display, and fingerprint door lock.
The Arduino board has many built-in features and functions that you can use to create your projects.
For example, you could use the Arduino board as a controller for your robot by programming it to send commands to the motors and sensors of the robot.
A deeper understanding of the Arduino board
Arduino boards are a fantastic way to get into electronics, programming, and robotics. They are small, easy to use, and don’t require much knowledge about electronics or programming.
The brain of the Arduino Board is the microcontroller chip that has an instruction set of machine language instructions that are executed by an interpreter or compiler.
The instructions are simple and easy to execute, making them perfect for embedded devices. The microcontroller receives the code that the user will write in Arduino software installed on the computer.
The microcontroller contains inputs and outputs. The microcontroller receives data from outside; These are inputs. The microcontroller transmits data to the outside; These are outputs.
There are many pins on the Arduino board: Analog Pins( A0, A1, A2, A3, A4, A5), digital pins(1, 2, 3, 4, 5, 6, 7, 8, 9, 10, 11, 12, 13), PWM pins(3, 5, 6, 9, 10, 11), built in LED, power supply connector, reset button, and USB connector.
What I need to build my Arduino project
Every new Arduino user needs to have at least these lists of the component to start building Arduino projects.
- Arduino board
- USB cable
- Breadboard
- Jumper wires
- Laptop
There is a starter kit available on the market where beginners can find all the basic necessities for building a simple project.
It is possible to start building Arduino Uno projects without having the components; A the ser need is the Thinkercard website to start run simulate Arduino projects.
All that the user need is available on the Thinkercard website.
Example of a project using Arduino: LED flashing.
Introduce the project:
Led flashing is a type of lighting that is used for advertising or for decoration. It can be used to attract customers, as it may be seen from a distance and draw attention to the advertisement.
The most common type of led flashing is the LED sign. These are often used in stores and other places where people go to buy something.
They can be put on a wall or on the roof of a building, so they can be seen from both inside and outside the store.
Another type of led flashing are LED lights, which are often put on buildings or trees during Christmas time, or any other festive season.
These lights usually have an automatic timer, so they turn on at night and stay lit until morning when they turn off automatically again.
Variable Arduino code
When you’re coding in Arduino, you’ll often find that you need to use a variable to store the data that is being processed.
For example, if you want to store the number of seconds elapsed since the Arduino was switched on, then we need a variable for this.
The name of a variable can be anything as long as it does not contain any spaces or special symbols.A variable name is usually made up of letters and numbers, but it can also include underscores (_) and dollar signs ($).
The code of the program
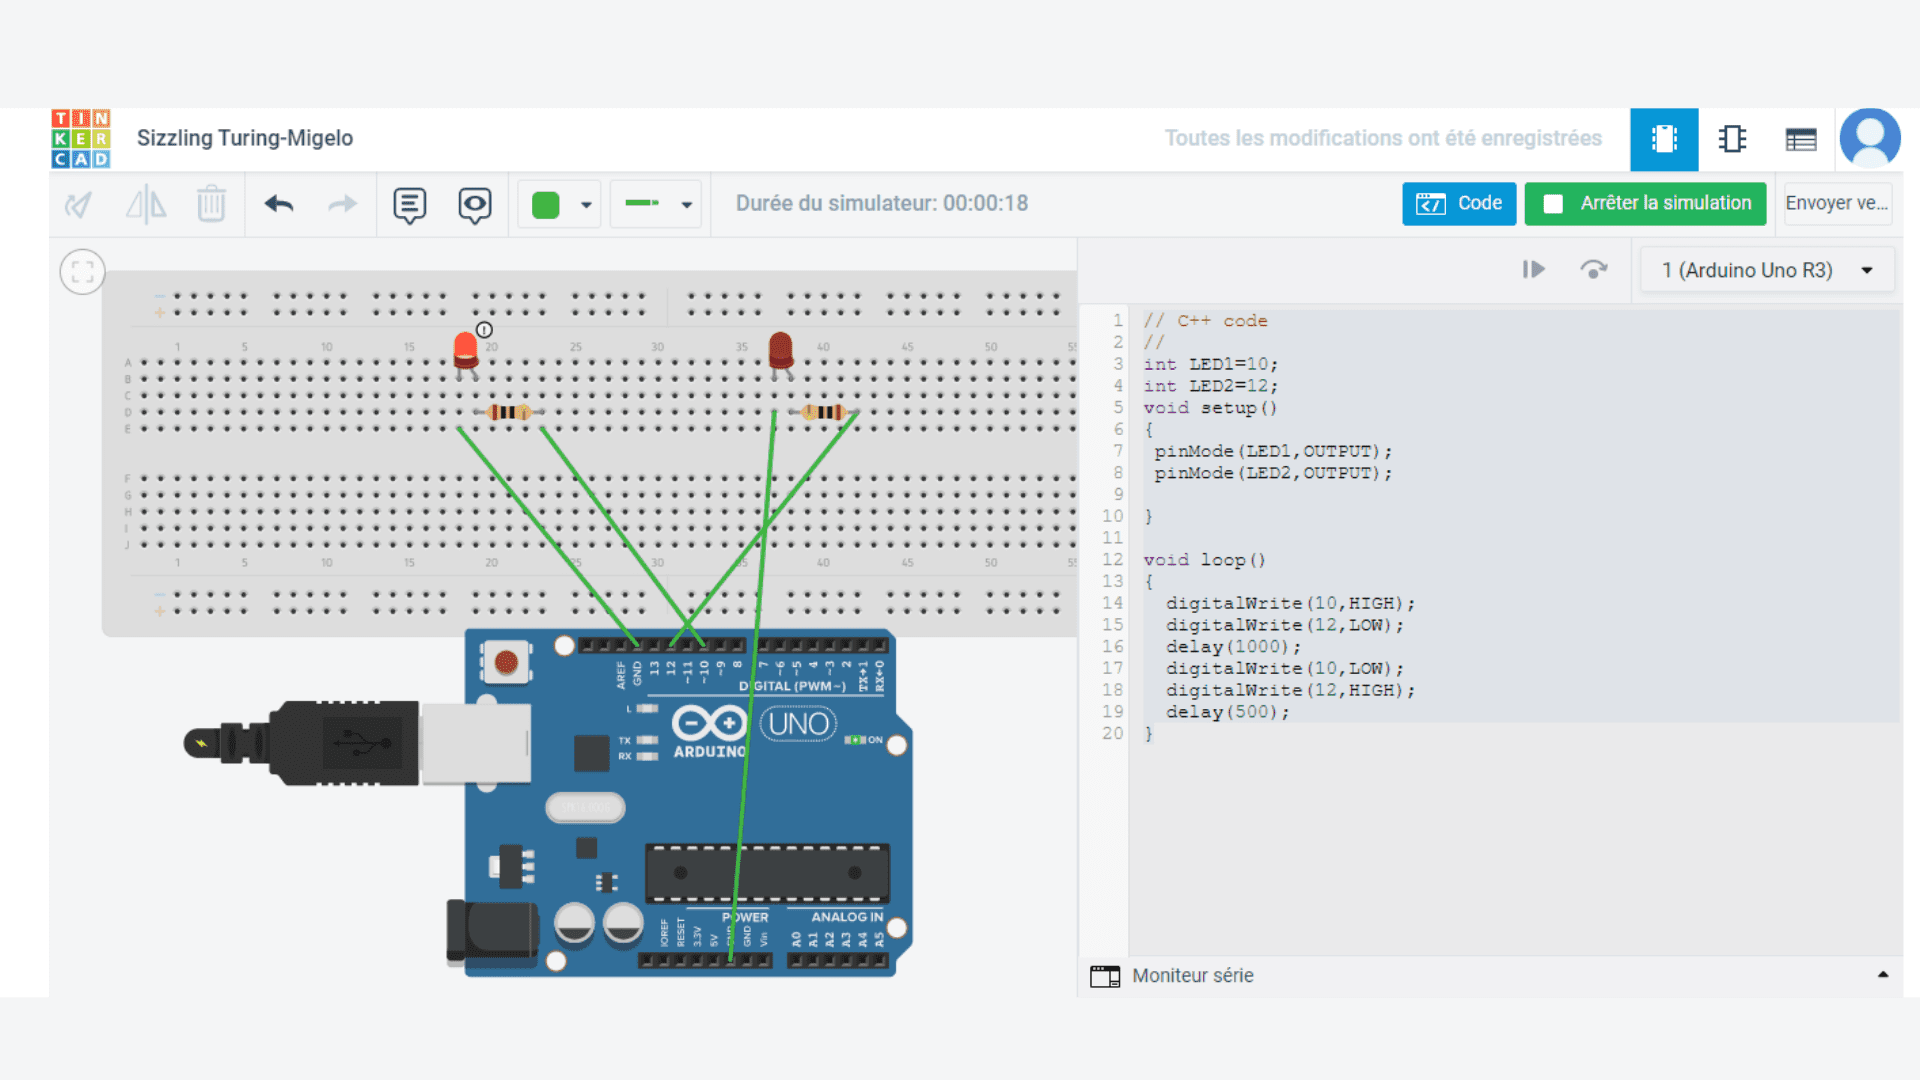
// C++ codeint LED1=10;int LED2=12;void setup(){pinMode(LED1,OUTPUT);pinMode(LED2,OUTPUT);}void loop(){digitalWrite(10,HIGH);digitalWrite(12,LOW);delay(1000);digitalWrite(10,LOW);digitalWrite(12,HIGH);delay(500);}
The components needed
- 2 LEDs
- 2 resistors
- Breadboard
- 4 jumper wires
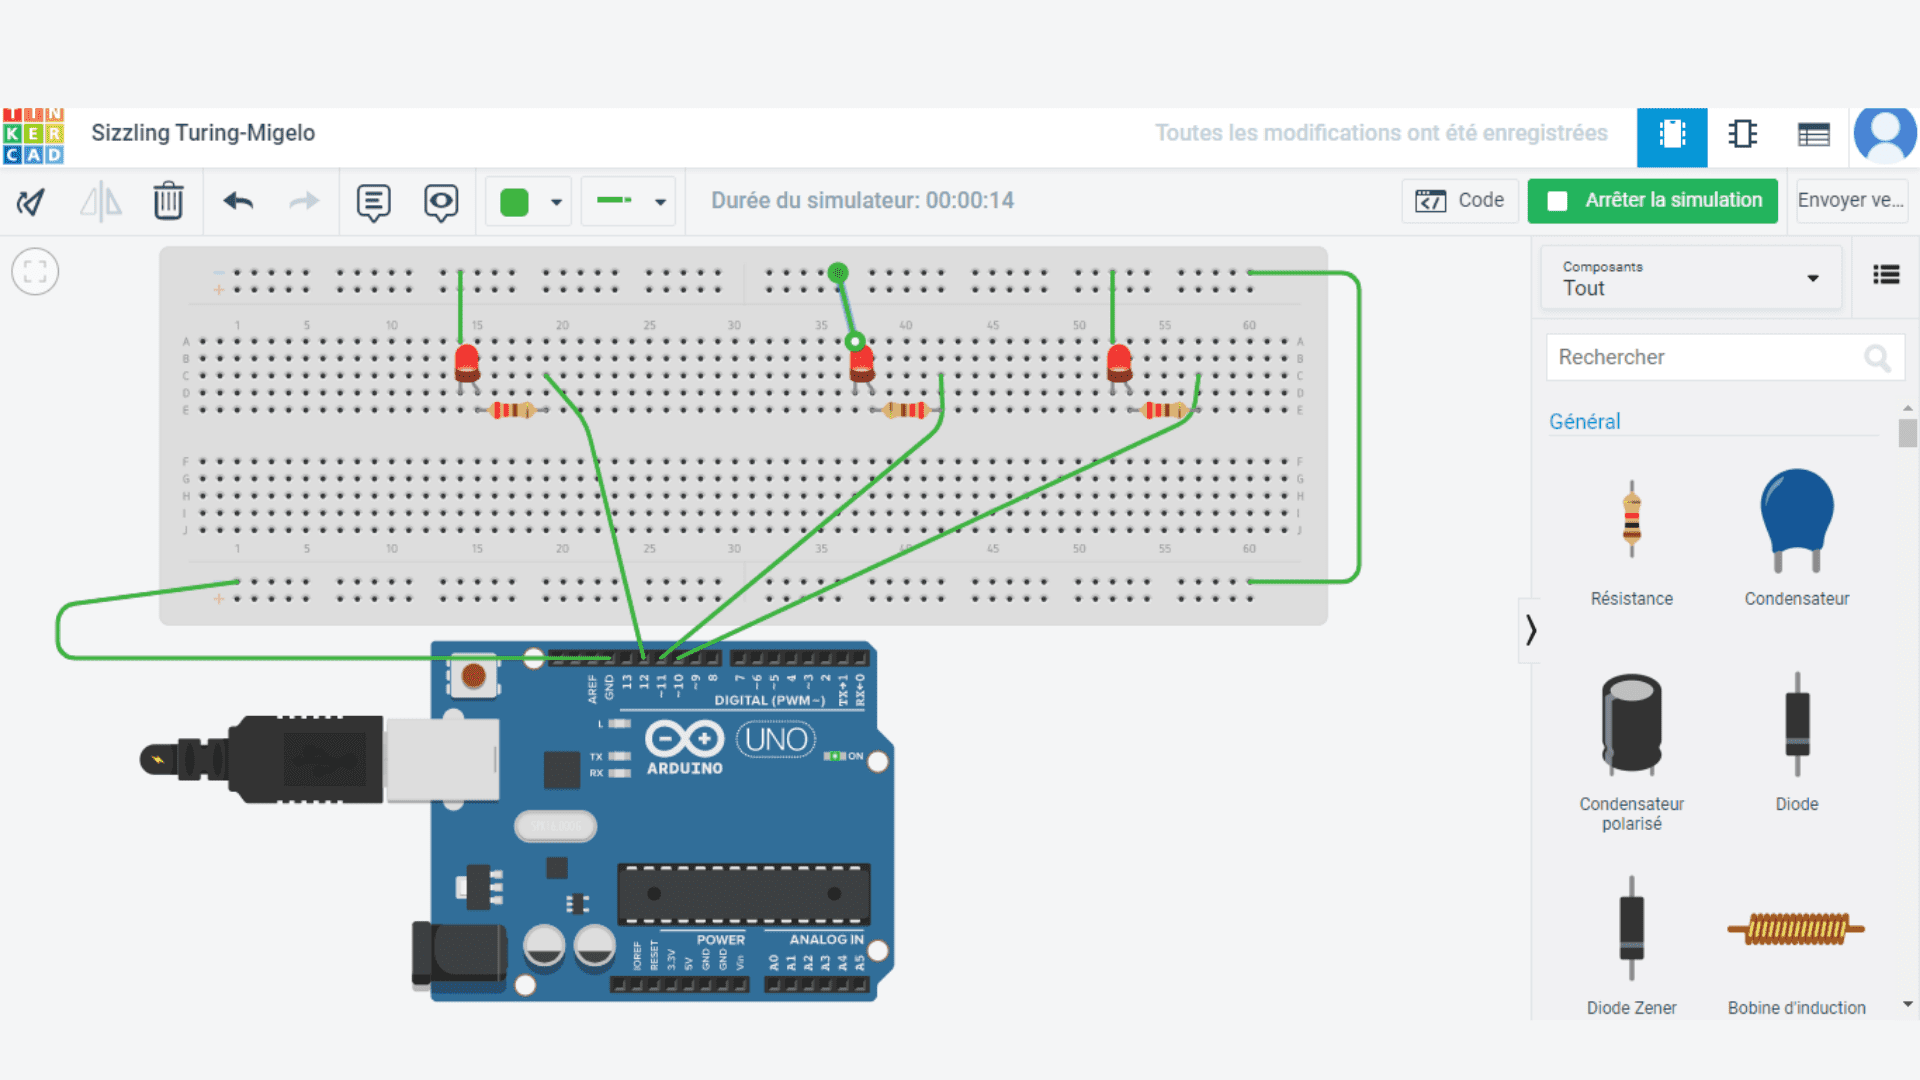
Description of the circuit installation
Description of the circuit installation
Connect the pin 10 of the Arduino board to a resistor 10 ohmConnect the second leg of the resistor to the anode of the LEDConnect the ground of the Arduino board to the cathode of the first LED.Connect the pin 12 of the Arduino board to a second resistor 10 ohmConnect the second leg of the second resistor to the anode of the LEDConnect the ground of the Arduino board to the cathode of the second LED.
-Run the Arduino project.
The LEDs will light up alternately; when the first lights up, the second goes out, and when the second goes out, the first lights up with a difference of one second.

Arduino and programming
The Arduino programming language is a simplified version of C++ designed to make it easier for beginning programmers. It is based on Wiring, which was developed by Hernando Barragan and meant to simplify the C programming language.
In the previous project, we identified two integer variables, and we stocked in the first variable, the pin ten, and the second one, the pin 12.
The variables let the programmer simplify his code and make it easy to read. Using variables in the Arduino code enables us to make it easier to change the code in the future.
Variable and datatype in general
Variables are containers for storing data in a computer’s memory. Variables can store different types of data, such as numbers and text.
Data type: A data type is the classification of the kind of data that a variable can store. There are four basic types of data types:
– Numbers: A number is a whole number or integer (positive or negative) with no decimal point.- Text: Text is any string of letters, symbols, and spaces representing words or numbers.- Boolean: Boolean values are either true or false.- Date/Time: The date and time are stored in a specific format to represent the year, month, day, hour, minute, and second.
What data type should we use with Arduino?
Arduino boards are used to interact with the physical world by taking in information from sensors and controlling lights, motors, and other physical devices.
We should use the following data types with Arduino:- byte: byte is a signed 8-bit integer value that ranges from -0 to 255. – int: int is a 16-bit value that ranges from -32767 to 32768.- int: int is a 16-bit value that ranges from -2,147,483,648 to 2,147.483.648. – long: long is a 32-bit signed integer value that ranges from -2,147.483.648 to 2,147.483.648.- float: float is a 32-bit can store numbers with decimal points.
Project development LED flashing.
The code of the program
// C++ code//This a comment//these are variables//The pins are stored in variablesint LED1=10;int LED2=11;int LED3=12;void setup(){pinMode(LED1,OUTPUT);pinMode(LED2,OUTPUT);pinMode(LED3,OUTPUT);}/* This is another commentwith another method of typing*/void loop(){digitalWrite(10,HIGH);delay(1000);digitalWrite(11,HIGH);delay(1000);digitalWrite(12,HIGH);delay(1000);digitalWrite(10,LOW);delay(1000);digitalWrite(11,LOW);delay(1000);digitalWrite(12,LOW);delay(1000);}

Programming and commenting
The Arduino programming language is a simplified version of C++ designed to make it easier for beginning programmers.
It is based on Wiring, which was developed by Hernando Barragan and meant to simplify the C programming language. The programmer can write the comment anywhere in the program.
It the essential that the compiler does not see the statement. In other words, the compiler does not consider the comment.
